InDesignSecrets LIVE!

Hello Cleveland!

And Austin! And Detroit, Minneapolis, and Secaucus, NJ!

These cities are the first announced stops on the InDesignSecretsLIVE! 2010 tour.

Click the image to go to InDesignSecretsLIVE for details.

Also on InDesignSecretsLIVE, you’ll find information about the single biggest, coolest, most awesome InDesign event of the year: The InDesign Print and ePublishing Conference. This is going to be absolutely sick. And by sick I mean ridiculously fun. Here are some of the details:

Print and ePublishing Conference

Seattle, Washington USA
May 12–14, 2010
Join the world’s top InDesign experts and the Adobe InDesign team, May 12-14 in Seattle for the InDesign event of the year! Find answers and valuable insight on the topics publishing for eBooks, print, interactive documents, and more! Be inspired by fresh ideas and new products. Includes 1-day pre-conference tutorials, then 2-day multi-track conference.

Not your typical InDesign Conference

Founded by world-renowned InDesign experts David Blatner and Anne-Marie Concepción, and dedicated to the proposition that InDesign professionals deserve a great learning experience, the Print and ePublishing Conference brings together over a dozen of the leading InDesign experts minds for three days of non-stop inspiration and education!

Topics include:

  • InDesign CS5: What to Expect
  • Boosting efficiency with InDesign’s automation features
  • Best practices for a cross-media workflow
  • Creating and managing ePub and Kindle documents
  • Working with Photoshop, Illustrator, Dreamweaver, and Flash
  • XML, XSL, and You

Speakers include:

  • David Blatner
  • Anne-Marie Concepción
  • Russell Viers
  • Rufus Deuchler
  • Mordy Golding
  • Michael Ninness, Group Product Manager, Creative Suite
  • Chris Kitchener, Senior Product Manager, InDesign
  • Olav Martin Kvern
  • Diane Burns
  • Keith Gilbert
  • Claudia McCue
  • Mike Rankin
  • David Creamer
  • Gabriel Powell
  • Colin Fleming
  • Pariah S. Burke
  • James Fritz
  • Adobe Engineering Team
  • Steve Jobs
  • James Cameron
  • Lady Ga-Ga
  • Chewbacca
  • President of the United States, Barack Obama
  • Marcel Marceau
  • The Rockettes
  • The ghost of Jimi Hendrix
  • and a special keynote address by Samuel L. Jackson

OK, I may have gotten a little carried away there somewhere after the Adobe Engineering Team, but you get the point. It’s going to be awesome. And yes, no joke, I am going to be speaking there too. And who knows, maybe we can channel the ghost of Jimi to give us some GREP tips on his guitar. See you in Seattle!

Publicious Links: The Bing Hits Edition

You probably know that Microsoft has released its own search engine to try and topple Skynet, er, Google. A few days ago, in the WordPress stats I started seeing referrals from Bing.com. Literally, Bing hits. Heh. So I searched for “Publicious” on Bing, and we got 9 out of the top 10 spots. Righteous.

If you weren’t totally exhausted from all the Flash Catalyst stuff I posted last week (or if you ignored it completely) you might want to check out Adobe’s summer-long eSeminar series on the Flash platform (Flash Builder and Flash Catalyst). Please don’t call them “webinars.” Eeeech. Ugliest word ever.

If you want to see what some people are actually creating with all this Flash stuff, check out Smashing Magazine’s 50 Beautiful Flash Websites. Don’t forget to follow Smashing Mag on Twitter for tons more.

Here’s my post on InDesign Secrets about continuation of Adobe branding into our geeky lifestyles, Coasting Into A Suite Life. By the way, I’m all for it. I’d buy some InDesign bedsheets in a heartbeat.

By the way, yesterday was Adobe Patch Day. Get’cher security updates while they’re hot.

There’s no such thing as a free lunch, unless it comes in a Bezier box. Best Design Options is offering 100 Websites Where You Can Download Free Vector Graphics.

While you’re up, can you grab me a few free patterns from the PatternCooler? Thanks.

With all that money you saved on your vectors and patterns, you can head over to FlashDen and purchase some little Flash applications. It’s a little app market where developers can hawk their coded wares. Even if you don’t intend to buy, it makes for some fun window shopping.

Want to influence the future of Photoshop? Take John Nack’s survey. Vote early and often.

Gurus Unleashed has a really cool new feature, a monthly wrap-up of the best news, tips, tutorials, etc for your favorite graphix apps. Here’s the May wrap-up for InDesign/InCopy. You can also find wrap-ups for Photoshop, Illustrator, Acrobat, MacPaint, etc. Just kidding, I think the MacPaint news would be pretty sparse. Then again, I could dominate it…

Whoever says print is dead is all wet. Literally, now that you can get almost anything printed on a shower curtain. These will be the coolest thing in the bathroom till we get shower curtains that are tv screens.

Or you can get a monitor that’s bigger than a giant flatscreen TV. It’s only $8,000, and so big it has to be curved around you.

Finally, I leave you with some high art, from Prepress Pilgrim, an excerpt from the world’s first prepress romance novel.

Guided by the Light (Blue, Magenta, or even Gray)

Guides are a wonderful thing. If you’ve ever drawn a guide on your layout so you can lock frames to that guide, you’ll know how nice it is to just click, drag, let go and get perfectly aligned rows of frames. But sometimes you don’t want dozens of guides drawn all over your page.

If you haven’t used the Margins and Columns panel under the Layout menu, I suggest you check it out. It’s a fantastic way to create guide lines on your layout without having anything that can be accidentally dragged or moved.  The margin guides can be hidden, are visible in InCopy, and make it a great way to show that you’ve got your art and text in the live area of your file. Whether you are creating a book where you need to make sure that there is the correct amount of white space in the gutter to keep things from getting cut off in the binding, or whether you’re creating a postcard and want to make sure you don’t have text too close to the trim so you don’t risk losing something that is very important in the final image. And if you’re often dragging around frames, if you keep your Snap to Guides selected, your boxes will lock to the margin guides and you’ll have less work to perform to get items to align.

If you have a non-facing pages document, your Margins and Columns guide will look like this:
nonfacingmargins
If you have a facing pages document, your Margins and Columns guide will look like this:
facingmargins

And that’s great. Having a guide on the page to always let you know if you’re within your safe printing or binding area is wonderful. But there is more that you can do with unselectable guides.

In that same window there are column guides you can set, too.  Imagine a newspaper front page. There are likely very even columns of text with white space between them and occasionally image boxes that align on those columns.  But what if your layout calls for you to have one really wide column and one skinny column? Well, if you choose 3 columns and adjust the gutter (which is the white space between columns) then you just can create one text area that runs across two columns and one text frame that runs across one. In this example the light blue box is your main text column and the light pink box is your secondary text column.
2textboxes

The Document Setup window also has settings that will apply permanent guides. If you’ve got documents that need to have a set bleed per your printer’s requests, you can set that as well in the Document Setup window. Click on More Options and you can enter in the amount of your bleed and a colored guide line will appear outside your document edge. If you enter a slug area in that same window you’ll get another colored line appearing outside your document edge. The slug area is a great place to put information that you may want to be able to include in a printout or a PDF, but that you would also want to exclude from a printout or PDF.  (When you print, you can choose to have your bleeds or your slug area included in the printout or PDF.

bleedslug

The nice thing about all these guide lines is that you can determine what color they appear in your document. And you can align those colors with the colors of your layers. Say your slug guide lines are light blue. You can create a layer called slug, make sure it is colored light blue, and then you can add whatever info to a text frame that you might find helpful. This makes the slug guidelines and your text frame the same color so they’re easy to visually relate to each other.
guidecolors

And because InDesign is almost as flexible as a performer for Cirque de Soleil you can either create all of these items when you create a new document:
guidescreate

You can have different margins on each spread, or even each page.

If you know you’re going to have just a few different types of shell files with guides, swatches, layers, even styles then you can create a file that has all the info in it you want all of your documents to have, save it as a template (it will have .indt in the name). Then when you want to create a new file choose File/New/Document from Template. Open your desired file and you’re ready to go and you’ll know that all of your preferences are set. In fact, if you choose that option now you’ll be taken to Bridge where you can see all the different templates that InDesign comes loaded with. Might be worth poking around to see if there is anything that will help you out.

Lunchtime Links

In anticipation of the O’Reilly Tools of Change Conference, today’s menu of lunch links has a mostly “changey” flavor. As opposed to my usual links, which often taste like chicken.

iPublishCentral is a solution by Impelsys that allows Publishers to upload PDFs and build marketing and distribution tools around them. Everything from Flash-enabled micro widgets to full blown Web portals. Whenever I hear “portal” I still think of the pylons from the Land of the Lost TV show, or the portal into John Malkovitch’s head in Being John Malkovitch. Sadly, uploading a PDF to iPublishCentral will not transport you to a prehistoric jungle. But it may help you sell some eBooks.

Lulu.com has an interesting idea for reincarnating your old books: Vintage Publishing Services. Basically you mail them a crumbling, but beloved old tome, they “gently scan” it, and send you back the original, plus a brand spankin’ new copy. You can also get a DVD with the high-res PDFs. The service isn’t cheap, but I find it interesting because I collect old history books, some of which are more than 100 years old and are quite literally turning to dust. Of course, you could always do the scanning yourself, send Lulu your PDFs and save the dough.

Ars technica has a huge and insightful article on the past, present, and future of eBooks. It makes the point that with the slightest effort, Apple could’ve dominated the eBook world with the iTunes store and the iPhone. So why haven’t they? I won’t give away the answer, but it begins with Steve and ends with Jobs.

Woodwing has released Smart Connection 6, the latest iteration of their enterprise publishing platform. I’m interested in checking out the Content Station, a Flex-flavored rich internet application for publication planning and monitoring. Now if we can just get the RIA for authoring…SCE 6 also supports InDesign Libraries and Books. Hallefreakinleujah.

Thenextweb has TwitterKeys which are entities you can copy and paste into your tweets to spice them up with some graphical goodness (aka Dingbats).

Last, but never least, InCopySecrets has the straight dope on the right way to fix missing links to InCopy stories.

The Last Tip You’ll Ever Need

Tips, tricks, techniques, and tutorials. The four T’s that comprise so much of what I read and write about publishing tech on the Web. If you want/love/need/crave information about Photoshop, InDesign, Illustrator, Acrobat, and Quark, then what I’m about to share with you is the last tip you’ll ever need. Or it’s the neverending tip. Actually, it’s a million tips in one. Ready? Check out Gurus Unleashed. That’s it. Underwhelming? Not at all. Gurus Unleashed, the brainchild of Pariah S. Burke (author of Mastering InDesign CS3 for Print Design and Production), collects tips, tricks, techniques, and tutorials from around the web and delivers them right to your inbox, RSS reader, or Twitter feed. You don’t have to seek out the tips; they find you. Here’s tiny sample from my Twitter feed:

plish-gurutwit

The daily tide of knowledge is nearly overwhelming. Last Friday I got 27 tweets from Gurus Unleashed. Every one a tempting morsel. It’s like that scene from I Love Lucy in the candy factory.

And the Twiter feed is only the 5 most recent posts each hour. The RSS feed has the whole enchilada. The links keep coming faster than you can click ’em. Pretty soon you’re stuffing them in your pockets, under your hat, and down your shirt. Sometimes you just read the titles and sigh, knowing you’ll never have the time or the brain capacity to take it all in. Dang, the Internet is big. At least thanks to Pariah and Gurus Unleashed (over 7000 articles and counting), you don’t have to spend as much time seeking out publishing tips. You just have to try to figure out how to cope with the massive avalanche of goodies rolling past.

A Look Under the Hood of the Hybrid

Got such a good response with the hybrid InCopy-XML workflow, I felt like it was worth revisiting to go into some details. Let’s look at the task of creating a new Schema file with XMLSpy.

In The Grand Schema of Things

The whole reason I start with a Schema and not a DTD is that XMLSpy lets you graphically create Schema. It is a heck of a lot easier for a non-programer to do than writing the code from scratch. But I won’t lie to you. You still need to learn something about XML in general and Schema (with a captial “S”) in particular. It’s not quite as easy as just drawing a diagram of your content model.

Well, you can draw pretty much whatever you want, but if you don’t know the pitfalls, you’ll get validation errors. And without a valid Schema, you can’t create a that user-friendly authoring template that you need to sell your editors on this whole XML workflow thing.

Help!

Learning XMLSpy can be frustrating for someone who’s used to working with programs like Word and the Creative Suite. The rules for making valid code are strict, the error messages and other jargon might as well be written in another language. Which, actually it is. And the Help won’t teach you anything about XML you didn’t already know. It barely teaches you about XMLSpy. It assumes you know all the rules for coding, and just tells you which buttons perform which functions.

You could buy a printed copy of the manual on E-Bay for $108 (Altova doesn’t sell ’em). But instead I would recommend you do the tutorial and then keep something like the O’Reilly book XML in a Nutshell within reach at all times, to serve as a de facto manual. That way you can use that $70 for beer and stand just about the same odds of making a useable Schema.

Namespaces

You need to learn about namespaces right off the bat and make them part of your Schema design so you can use InDesign’s feature of mapping XML attributes to paragraph and character styles. This is necessary since not every paragraph is going to look the same in your layout, but they are still all just paragraphs. I’m not going to get deep into namespaces here since I could devote a few posts to nothing but namespace issues I’ve had.

OK, now that I made it sound hard, let’s make it look easy.

Diagramming a Content Model

We’ll create a basic Schema for a Major League Baseball team, in honor of the World Series Champeen Red Sox. In XMLSpy, choose File > New and pick W3C XSD from the list of file formats.

Enter the name of your root element in our case, baseball_team, and an optional description of it.

plish010-bluetree.jpg

At any time you can choose Text view to see or edit the code. That’s when you’re really glad you don’t need to ever see or edit the code. It’s like opening up the washing machine while it’s running. You just take a peek, maybe throw a pair of socks in there, and close the lid.

plish010-code.jpg

Then click the little blue tree icon to show the Schema diagram. This is where the fun begins.

You now have a wide open field in which to draw out all the children of the root element.

Everything is connected automatically, so you won’t have any loose floating pieces. Now you apply all that stuff you learned in your planning meetings, the elements, the attributes, restrictions and relationships they have. You drag out a connector from the baseball_team element, and choose what kind of child it has.

plish010-addchild.jpg

In this case, it’s a sequence (indicated by the line of dots) of two elements, players and coaching_staff.

plish010-playercoach.jpg

players is a sequence of position_players and pitchers. position_players is a sequence of infielders, outfielders, and bench, all with an attribute describing the postion they play. You keep going in this manner till you’ve finished diagramming your content model.

plish010-wholeschema.jpg

Regarding attributes, if you want to give your editors a pop-up list of values to choose from, enter the legal attribute names in the facets > enumerations tab.

plish010-enumeration.jpg

You can also assign minimum and maximum occurrence values to restrict how many of a certain element you’ll allow. In our example, you have to have at least 3 outfielders on your roster to field a team (and pass a validation test). If no number is shown under an element the schema calls for exactly one of that element. Or you can make an element optional by setting the minimum occurrence to zero, like I did with the assistant_manager and the box outline becomes dashed.

Once you are done, you can convert the Schema to a DTD for importing into InDesign, or showing your friends in the bleacher seats.

plish010-dtd.jpg

On second thought, don’t show your DTD in the bleacher seats. That conversation probably won’t end well.

Of course the devil’s in the details, and there are plenty more details, but let’s leave it there for now. That wasn’t too painful, was it? We made the engine of the hybrid InCopy-XML workflow, a real live W3C XML Schema, without hand coding it.

Test Drive A Hybrid Workflow

You never know where inspiration will come from. Yesterday it came to me in the form of a traffic jam slowing my ride to work. Sitting on the commuter bus, mired in “bumpa-ta-bumpa”, I stared out the window. Life on pause. I imagined the lake of gasoline that was fueling all these cars, puffing out their tailpipes, melting Greenland. Then a shiny red Toyta Prius rolled by. It had a good vibe, like a forward-thinking, best alternative in an otherwise unworkable situation. A hybrid.

This was definitely a sign from the cosmos that it was time to talk about the hybrid XML-InCopy workflow I’d been playing with since last year. I had planned to finish off the cookbook project tonight, but this idea overtook it in my brain. I offer it up now in case any of you out there is stuck in a traffic jam of a publishing workflow, with a line of products and file formats in each other’s way, slowly crawling ahead while the clock ticks ticks ticks.

The point of a hybrid workflow is to combine the virtues of XML and InCopy to give you speed and efficiency that is otherwise impossible. Single-source authoring means multiple print and/or Web products derive and arrive simultaneously from the same set of keystrokes. You author and edit in XML, transform when necessary, and use InCopy to preview your print layouts, where space is finite and styling matters, as you go.

I know there are people out there who have written amazing scripts, or developed plug-ins or workflow systems that can accomplish what I’m going to show you better, faster, with more goodies. But as always, I write about what can you do with the off-the-shelf tools and garden variety skills. Or if you don’t currently possess those skills, you can come by them without completely re-wiring your brain. Perhaps someday Adobe will release the equivalent of an electric car, XML authoring as part of the Creative Suite, and we’ll all be merrily speeding down the Cross-Media Expressway. What follows is my idea of how to do today. And it works. So hop in the hybrid and take it for a spin.

The Pitch

With a W3C XML Schema as the foundation of your workflow, you can develop multiple print and online products simultaneously, and achieve efficiency and savings through content re-use with off-the-shelf tools.

The Tools

To do this you’re going to need InDesign CS3, InCopy CS3, and the Altova MissionKit For XML Developers. The MissionKit is an XML Developer’s equivalent of the Adobe Creative Suite. It’s three applications that work in concert to for the creation and transformation of XML files: XMLSpy, StyleVision, and MapForce. This is a Windows-only package. There is no Mac version, so if you kneel at the altar of Jobs like I do, you need emulation software like Parallels. Syncrosoft’s oXygen is an alternative that runs on the Mac, but only if you don’t need a lot of help writing XSLT. I do. MapForce gives you graphical creation of XSLT, or as I call it, XSLTW (XSL with Training Wheels). I’m not trying to do a commercial for Altova, but their stuff is the only stuff that I know works for everything we’re trying to do.

Step 1: Planning

This is the big one. Map out all your content. Depending on the complexity of your content, this can be a tough job, so you only want to do it once. Spend enough time to get it right, since everything flows downhill from here. Every screw-up or oversight at this stage will echo throughout the workflow in some combination of time, aggravation, or cost. And everyone needs to know that once this is done, there’s no changing the structure, at least not for anyone who wishes to remain with the company.

Your map should show every piece and where it fits into the overall scheme of your project. Map every recombination, and every dependency. Leave no stone unturned. This part can be a real eye opener. If you survive with your sanity intact, you will understand your content better than ever before and maybe discover new ways of using it.

Reverse engineer your own content. Cut up books and move the pieces around as they would move in the digital realm. Follow the life of a lowly paragraph as it appears throughout your product line. Once you grasp the details, you can answer the first key question. What kind of schema best suits your needs: a custom built-from-scratch schema or a generic format? Do you have the time and money to make the former? Do you have the flexibility for the latter? A bad fit might cost you more in the long run. Investigate DocBook and DITA. If you go generic, skip to step 3.

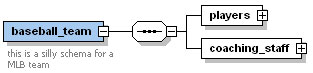
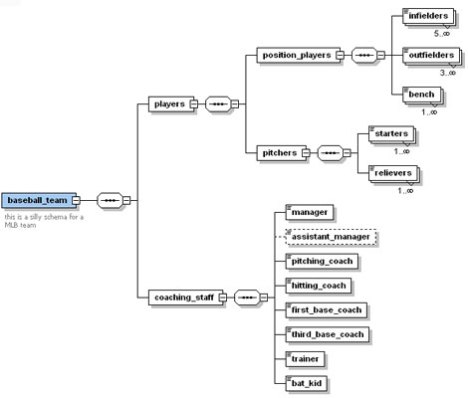
Step 2: Build the Schema File

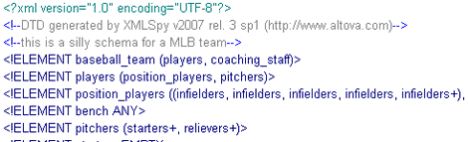
With the understanding that you gained by mapping your content, you can now build an XML Schema that will guide your authoring, transformation, and output. Why a Schema? Why not a DTD? I have nothing against DTDs. In fact, they are more appropriate for describing book-like things. Schema excel at describing data more than documents. In fact, I love DTDs so much, the other day on the highway I was passed by someone with the license plate 736 DTD, and I thought “hey, that’s cool.” Then I felt the urge to slap myself for being such a geek.

I say use Schema purely because the Altova tools support Schema in ways that they don’t support DTDs. Namely, you can graphically create a Schema in XMLSpy. I feel a little hypocritical because this is the same tool-based thinking I dissed in a previous post. But facts is facts, and until I find another tool that can do this workflow end-to-end with a DTD, I’m sticking to my story. Actually, if you must have a DTD, there is a workaround: build a Schema, then use XMLSpy to convert the Schema to a DTD.

Step 3: Create Authoring Templates

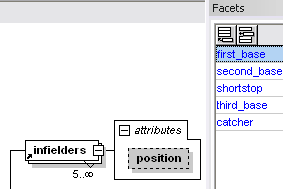
Using StyleVision you take your Schema and apply styling to it to make a user-friendly authoring template. This is something the oXygen can do too. You choose from CSS properties to apply fonts, spacing, and position to your elements. You can make pop-up menus for standardizing choices, and clickable links to insert required elements.

Step 4: Develop Layout Templates

Import sample XML files into InDesign, structure and style it. Set up styles to tags mapping. Make use of the Story Editor to be sure your tagging remains intact and whitespace characters are where they belong.

Step 5: Distribute Authoring Template

Let the writers have at it.

Step 6: Import XML Files into InDesign

And when you do, be sure to maintain the live link, so the XML file appears in the Links panel.

Step 7: Export to InCopy

BUT tell everyone that the InCopy files are untouchable! Hide them. Instead, InCopy users drop the InDesign file onto InCopy to open it directly.

Step 8: Editors Do the InCopy Two Step

Check out the appropriate stories from the InDesign layout. Show the Links panel to see the XML file. Edit in the XML file, save it. Go back to the Links panel and update the link to the XML file. Magic! You have your cake (XML) and eat (publish) it too.

The fact that this works at all is a complete accident–the unintended consequence of 3 InCopy capabilities: access to the links palette (intended for the management of placed images), the ability to use an InDesign layout for preview (so one story can be simultaneously linked to both an XML file and a .incx file), and the ability to maintain a live link to to text files (meant for Word and spreadsheets). Sometimes things just fall into place.

Editors can do some work, like styling, and working with boilerplate (untagged) content in the layout file. But they must understand the fundamental truth that anything they do between the tags in the layout will be wiped out the next time the XML file is saved. Stuff outside the tags, in whitespace elements, remains.

At the end of the day, when all is said and done, you still have intact XML files, with the most up-to-date content, ready to be flowed into whatever template or media you need.

Bonus Points

At any point in this workflow you can use MapForce to create XSLT to transform your content, making it fit another purpose. You don’t need automated workflow systems or scripts to make that transformation happen now that InDesign supports XSLT. Examples of what you can do with XSLT: Making HTML for Web presentation, making PDF, making alternative print products by gathering or sorting content according to attributes, making NIMAS files.

Math Doesn’t Add Up

All this is great, but it will not work for you if you need MathML. The only ways to get MathML in and out of InDesign involve scripted solutions, or customized versions of 3rd party plug-ins like MathMagic. I hope that some day InMath, which has always been my favorite equation editor for InDesign, will add MathML support. Design Science’s MathType speaks fluent MathML, and you can place those equations (in EPS format) into an InDesign layout. PowerMath also exists for InDesign but I haven’t tried it out. Note to self: I should do a future post comparing all the different ways to do math in InDesign.

Next Steps

My next project (if ever stop spending all my free time blogging) is to experiment with Office Open XML. Since the new version of Office has XML underlying every file format, why not exploit that, and author in Word, transform OOML to your Schema, then import in InDesign, Web, etc. It should work like a charm, and it’ll probably have authors and editors breathing a sigh of joyful relief that the XML authoring tool they have to use is Word. It may not be the electric car, but it’s pretty close to one of those that runs on old french fry oil. Mmmm, I could go for some fries right now.