A Look Under the Hood of the Hybrid

Got such a good response with the hybrid InCopy-XML workflow, I felt like it was worth revisiting to go into some details. Let’s look at the task of creating a new Schema file with XMLSpy.

In The Grand Schema of Things

The whole reason I start with a Schema and not a DTD is that XMLSpy lets you graphically create Schema. It is a heck of a lot easier for a non-programer to do than writing the code from scratch. But I won’t lie to you. You still need to learn something about XML in general and Schema (with a captial “S”) in particular. It’s not quite as easy as just drawing a diagram of your content model.

Well, you can draw pretty much whatever you want, but if you don’t know the pitfalls, you’ll get validation errors. And without a valid Schema, you can’t create a that user-friendly authoring template that you need to sell your editors on this whole XML workflow thing.

Help!

Learning XMLSpy can be frustrating for someone who’s used to working with programs like Word and the Creative Suite. The rules for making valid code are strict, the error messages and other jargon might as well be written in another language. Which, actually it is. And the Help won’t teach you anything about XML you didn’t already know. It barely teaches you about XMLSpy. It assumes you know all the rules for coding, and just tells you which buttons perform which functions.

You could buy a printed copy of the manual on E-Bay for $108 (Altova doesn’t sell ’em). But instead I would recommend you do the tutorial and then keep something like the O’Reilly book XML in a Nutshell within reach at all times, to serve as a de facto manual. That way you can use that $70 for beer and stand just about the same odds of making a useable Schema.

Namespaces

You need to learn about namespaces right off the bat and make them part of your Schema design so you can use InDesign’s feature of mapping XML attributes to paragraph and character styles. This is necessary since not every paragraph is going to look the same in your layout, but they are still all just paragraphs. I’m not going to get deep into namespaces here since I could devote a few posts to nothing but namespace issues I’ve had.

OK, now that I made it sound hard, let’s make it look easy.

Diagramming a Content Model

We’ll create a basic Schema for a Major League Baseball team, in honor of the World Series Champeen Red Sox. In XMLSpy, choose File > New and pick W3C XSD from the list of file formats.

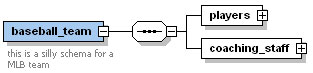
Enter the name of your root element in our case, baseball_team, and an optional description of it.

plish010-bluetree.jpg

At any time you can choose Text view to see or edit the code. That’s when you’re really glad you don’t need to ever see or edit the code. It’s like opening up the washing machine while it’s running. You just take a peek, maybe throw a pair of socks in there, and close the lid.

plish010-code.jpg

Then click the little blue tree icon to show the Schema diagram. This is where the fun begins.

You now have a wide open field in which to draw out all the children of the root element.

Everything is connected automatically, so you won’t have any loose floating pieces. Now you apply all that stuff you learned in your planning meetings, the elements, the attributes, restrictions and relationships they have. You drag out a connector from the baseball_team element, and choose what kind of child it has.

plish010-addchild.jpg

In this case, it’s a sequence (indicated by the line of dots) of two elements, players and coaching_staff.

plish010-playercoach.jpg

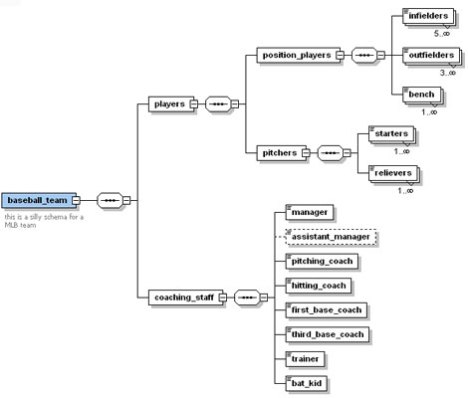
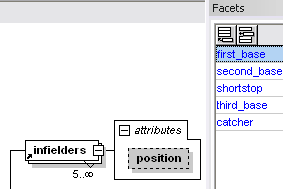
players is a sequence of position_players and pitchers. position_players is a sequence of infielders, outfielders, and bench, all with an attribute describing the postion they play. You keep going in this manner till you’ve finished diagramming your content model.

plish010-wholeschema.jpg

Regarding attributes, if you want to give your editors a pop-up list of values to choose from, enter the legal attribute names in the facets > enumerations tab.

plish010-enumeration.jpg

You can also assign minimum and maximum occurrence values to restrict how many of a certain element you’ll allow. In our example, you have to have at least 3 outfielders on your roster to field a team (and pass a validation test). If no number is shown under an element the schema calls for exactly one of that element. Or you can make an element optional by setting the minimum occurrence to zero, like I did with the assistant_manager and the box outline becomes dashed.

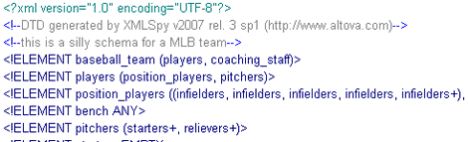
Once you are done, you can convert the Schema to a DTD for importing into InDesign, or showing your friends in the bleacher seats.

plish010-dtd.jpg

On second thought, don’t show your DTD in the bleacher seats. That conversation probably won’t end well.

Of course the devil’s in the details, and there are plenty more details, but let’s leave it there for now. That wasn’t too painful, was it? We made the engine of the hybrid InCopy-XML workflow, a real live W3C XML Schema, without hand coding it.

Test Drive A Hybrid Workflow

You never know where inspiration will come from. Yesterday it came to me in the form of a traffic jam slowing my ride to work. Sitting on the commuter bus, mired in “bumpa-ta-bumpa”, I stared out the window. Life on pause. I imagined the lake of gasoline that was fueling all these cars, puffing out their tailpipes, melting Greenland. Then a shiny red Toyta Prius rolled by. It had a good vibe, like a forward-thinking, best alternative in an otherwise unworkable situation. A hybrid.

This was definitely a sign from the cosmos that it was time to talk about the hybrid XML-InCopy workflow I’d been playing with since last year. I had planned to finish off the cookbook project tonight, but this idea overtook it in my brain. I offer it up now in case any of you out there is stuck in a traffic jam of a publishing workflow, with a line of products and file formats in each other’s way, slowly crawling ahead while the clock ticks ticks ticks.

The point of a hybrid workflow is to combine the virtues of XML and InCopy to give you speed and efficiency that is otherwise impossible. Single-source authoring means multiple print and/or Web products derive and arrive simultaneously from the same set of keystrokes. You author and edit in XML, transform when necessary, and use InCopy to preview your print layouts, where space is finite and styling matters, as you go.

I know there are people out there who have written amazing scripts, or developed plug-ins or workflow systems that can accomplish what I’m going to show you better, faster, with more goodies. But as always, I write about what can you do with the off-the-shelf tools and garden variety skills. Or if you don’t currently possess those skills, you can come by them without completely re-wiring your brain. Perhaps someday Adobe will release the equivalent of an electric car, XML authoring as part of the Creative Suite, and we’ll all be merrily speeding down the Cross-Media Expressway. What follows is my idea of how to do today. And it works. So hop in the hybrid and take it for a spin.

The Pitch

With a W3C XML Schema as the foundation of your workflow, you can develop multiple print and online products simultaneously, and achieve efficiency and savings through content re-use with off-the-shelf tools.

The Tools

To do this you’re going to need InDesign CS3, InCopy CS3, and the Altova MissionKit For XML Developers. The MissionKit is an XML Developer’s equivalent of the Adobe Creative Suite. It’s three applications that work in concert to for the creation and transformation of XML files: XMLSpy, StyleVision, and MapForce. This is a Windows-only package. There is no Mac version, so if you kneel at the altar of Jobs like I do, you need emulation software like Parallels. Syncrosoft’s oXygen is an alternative that runs on the Mac, but only if you don’t need a lot of help writing XSLT. I do. MapForce gives you graphical creation of XSLT, or as I call it, XSLTW (XSL with Training Wheels). I’m not trying to do a commercial for Altova, but their stuff is the only stuff that I know works for everything we’re trying to do.

Step 1: Planning

This is the big one. Map out all your content. Depending on the complexity of your content, this can be a tough job, so you only want to do it once. Spend enough time to get it right, since everything flows downhill from here. Every screw-up or oversight at this stage will echo throughout the workflow in some combination of time, aggravation, or cost. And everyone needs to know that once this is done, there’s no changing the structure, at least not for anyone who wishes to remain with the company.

Your map should show every piece and where it fits into the overall scheme of your project. Map every recombination, and every dependency. Leave no stone unturned. This part can be a real eye opener. If you survive with your sanity intact, you will understand your content better than ever before and maybe discover new ways of using it.

Reverse engineer your own content. Cut up books and move the pieces around as they would move in the digital realm. Follow the life of a lowly paragraph as it appears throughout your product line. Once you grasp the details, you can answer the first key question. What kind of schema best suits your needs: a custom built-from-scratch schema or a generic format? Do you have the time and money to make the former? Do you have the flexibility for the latter? A bad fit might cost you more in the long run. Investigate DocBook and DITA. If you go generic, skip to step 3.

Step 2: Build the Schema File

With the understanding that you gained by mapping your content, you can now build an XML Schema that will guide your authoring, transformation, and output. Why a Schema? Why not a DTD? I have nothing against DTDs. In fact, they are more appropriate for describing book-like things. Schema excel at describing data more than documents. In fact, I love DTDs so much, the other day on the highway I was passed by someone with the license plate 736 DTD, and I thought “hey, that’s cool.” Then I felt the urge to slap myself for being such a geek.

I say use Schema purely because the Altova tools support Schema in ways that they don’t support DTDs. Namely, you can graphically create a Schema in XMLSpy. I feel a little hypocritical because this is the same tool-based thinking I dissed in a previous post. But facts is facts, and until I find another tool that can do this workflow end-to-end with a DTD, I’m sticking to my story. Actually, if you must have a DTD, there is a workaround: build a Schema, then use XMLSpy to convert the Schema to a DTD.

Step 3: Create Authoring Templates

Using StyleVision you take your Schema and apply styling to it to make a user-friendly authoring template. This is something the oXygen can do too. You choose from CSS properties to apply fonts, spacing, and position to your elements. You can make pop-up menus for standardizing choices, and clickable links to insert required elements.

Step 4: Develop Layout Templates

Import sample XML files into InDesign, structure and style it. Set up styles to tags mapping. Make use of the Story Editor to be sure your tagging remains intact and whitespace characters are where they belong.

Step 5: Distribute Authoring Template

Let the writers have at it.

Step 6: Import XML Files into InDesign

And when you do, be sure to maintain the live link, so the XML file appears in the Links panel.

Step 7: Export to InCopy

BUT tell everyone that the InCopy files are untouchable! Hide them. Instead, InCopy users drop the InDesign file onto InCopy to open it directly.

Step 8: Editors Do the InCopy Two Step

Check out the appropriate stories from the InDesign layout. Show the Links panel to see the XML file. Edit in the XML file, save it. Go back to the Links panel and update the link to the XML file. Magic! You have your cake (XML) and eat (publish) it too.

The fact that this works at all is a complete accident–the unintended consequence of 3 InCopy capabilities: access to the links palette (intended for the management of placed images), the ability to use an InDesign layout for preview (so one story can be simultaneously linked to both an XML file and a .incx file), and the ability to maintain a live link to to text files (meant for Word and spreadsheets). Sometimes things just fall into place.

Editors can do some work, like styling, and working with boilerplate (untagged) content in the layout file. But they must understand the fundamental truth that anything they do between the tags in the layout will be wiped out the next time the XML file is saved. Stuff outside the tags, in whitespace elements, remains.

At the end of the day, when all is said and done, you still have intact XML files, with the most up-to-date content, ready to be flowed into whatever template or media you need.

Bonus Points

At any point in this workflow you can use MapForce to create XSLT to transform your content, making it fit another purpose. You don’t need automated workflow systems or scripts to make that transformation happen now that InDesign supports XSLT. Examples of what you can do with XSLT: Making HTML for Web presentation, making PDF, making alternative print products by gathering or sorting content according to attributes, making NIMAS files.

Math Doesn’t Add Up

All this is great, but it will not work for you if you need MathML. The only ways to get MathML in and out of InDesign involve scripted solutions, or customized versions of 3rd party plug-ins like MathMagic. I hope that some day InMath, which has always been my favorite equation editor for InDesign, will add MathML support. Design Science’s MathType speaks fluent MathML, and you can place those equations (in EPS format) into an InDesign layout. PowerMath also exists for InDesign but I haven’t tried it out. Note to self: I should do a future post comparing all the different ways to do math in InDesign.

Next Steps

My next project (if ever stop spending all my free time blogging) is to experiment with Office Open XML. Since the new version of Office has XML underlying every file format, why not exploit that, and author in Word, transform OOML to your Schema, then import in InDesign, Web, etc. It should work like a charm, and it’ll probably have authors and editors breathing a sigh of joyful relief that the XML authoring tool they have to use is Word. It may not be the electric car, but it’s pretty close to one of those that runs on old french fry oil. Mmmm, I could go for some fries right now.